Thursday, April 23, 2009

The BrokeAss Gourmet Good Vibes Giveaway Post: Recipe: Asparagus with Lemon, Parmesan and Prosciutto and Rolled Lasagna with Bechamel Sauce

I am so very, very excited to have won! You can read all about the contest and the prize at both BrokeAss Gourmet and at Good Vibes. OMG!

Anyway, I wanted to write a more detailed post about my submission. So, here you have it! The step by step instructions, pictures included, of how to make my winning 3 course sexy locavore meal! (Well, 2 courses, anyway. The Molten Chocolate Cake has already been published in my blog. You can find the recipe here.)

Oh, and just a quick note, I have the recipes listed here in order of course, but if you actually make all 3 courses you should make the lasagna first, pop it in the oven, then start on the asparagus. If you plan on making dessert, I'd cook the cakes halfway then put them in the oven after you eat the asparagus so that by the time you're done with dinner, the cakes are ready to go!

Asparagus with Lemon, Prosciutto and Parmesan

Ingredients:
1 small bunch asparagus tips
1/2 lemon
2 thin slices prosciutto, chopped into big pieces
1-2 TB parmesan, to top
salt
pepper
1 tsp olive oil

Cut the very bottom off of the asparagus, but leave whole otherwise.
Cook in a shallow pan with 1" of water for 3-5 min, just until bright green. This is about what 1" of water looks like.
This is what they will look like when you need to turn off the heat. Bright green! See the color difference?
Strain the water. Add 1/2 lemon of juice and about 1/4 tsp salt and a few turns of a pepper mill. Cook for another 3-5 minutes, until asparagus is cooked as you like it. (I like mine crisp, so I would cook for about 3 min, but you may like yours more well done.) Remove to a plate. Crisp prosciutto in the pan for about 1 minute. Top the asparagus with the prosciutto, parmesan, cracked pepper, and the olive oil. Serve. Yes, it tastes as good as it looks!


Rolled Lasagna with Bechamel

Ingredients:

Lasagna Rolls:
1/3 C chopped onion
1 clove garlic
1/2 C ricotta
1/2 C jack cheese
1.5 C uncooked chard, leaves and stems
2 oz prosciutto (3 thin slices)
6 lasagna noodles
1 TB olive oil
1/2 tsp salt
pepper

Sauce:
1 TB butter
1 C milk
1 TB flour
Pinch of nutmeg
1/2 tsp salt
pepper

Rolls:
Set oven to 400. Cook noodles according to package directions, cutting the cook time by about 1/4. We don't want the noodles to be cooked all the way, because we will be finishing the dish in the oven.
Mix together ricotta, jack cheese, salt and pepper.
Saute onion and garlic in olive oil. When translucent, add chard and 1/4 C water.
Cook until reduced by half. Add more water throughout cooking if needed. Cut the prosciutto pieces in half lengthwise. When the chard and noodles are done, you're ready to roll. (Ha!) Lay the noodles on a flat surface.
Divide all ingredients by 6; there should be about 1 TB for each noodle. Smooth 1 TB of cheese, 1 TB chard, and a piece of prosciutto on the noodle.
Gently roll and place in an oiled casserole dish seam side down.
Make sauce.

Sauce!:
Melt 1 TB butter in a pan. Add 1 TB flour; whisk to make a roux.
Slowly add 1 C milk, allowing ingredients to incorporate before adding more. This is what the sauce will look like when you add the milk.
Then you should whisk to fully incorporate the milk, and it will look like this.
Then add some more milk, and repeat until you've added all the milk. When you've added all the milk, add the salt, pepper and nutmeg. When adding the nutmeg, remember, a little really does go a long way! Don't over do it or the sauce will taste like Christmas, which isn't what we're going for here. :-)
Allow sauce to simmer for about 5 min. You want the sauce to be thick enough to coat the back of a metal spoon.
Turn off heat, pour sauce over noodle rolls. Top with parmesan.
Bake for 20 min. After 20 min, turn heat up to broil and bake for another 5 min to brown the top.
Yum! Serve, and enjoy!
I adore lasagna rolls. They feel so much more fancy than normal lasagna, and they are actually really easy (and cheap!) to make.

Thanks again to everyone heading over from BrokeAss Gourmet and Good Vibrations Magazine. If you had any questions about the recipes, please don't hesitate to email me at sefarros at gmail dot com.

Happy Eating!

<3 Stef

Hello, hello!

Hello to anyone who may be here from BrokeAss Gourmet! I am so excited to have won their Good Vibrations Giveaway with my sexy 3 course meal idea.

My blogging schedule is typically Tuesdays and Fridays, but in honor of my victory I am planning on doing a detailed write up of my winning recipes, with a lot more pictures than are posted on the BrokeAss site, later today. I figure I will have everything written and ready by 3pm.

If you would like to see the Molten Chocolate Cake recipe, that recipe was featured on Friday, April 10th. You can get to it by either using the Blog Archives on the right, or just scroll down.

Again, thanks so much to everyone, and I hope you enjoy what you see here! If you have any questions about any of the recipes posted, or about the ones I wrote for the BrokeAss giveaway, please don't hesitate to email me at sefarros at gmail dot com.
Wooden spoon meditation.

<3 Stef

Tuesday, April 21, 2009

Special "OMG It's HOT" Duo: Recipe: Pico de Gallo and Margaritas

It has been ungodly hot in San Francisco the past few days. As a result, I haven't felt like turning on the stove. Or the oven. Or anything that produces heat, really. I've subsisted on pico de gallo and margaritas.

Ok, that was a lie. But I am eating/drinking them right now, and I have to admit that the combination might just be the perfect summertime pair. Even though, technically, it isn't summertime.

Margarita (serves 1):
1 TB powdered sugar
1/4 C water
1 lime
1/2 orange
3 oz tequila
1.5 oz triple sec

Grab a cocktail shaker and put the sugar and water into the shaker. Squeeze the lime and orange into the shaker with the sugar. I use my handy dandy lemon squeezer apparatus.
Squeeze it! Squeeze them citrus fruits!
Add the tequila and triple sec. Now give the shaker a few good shakes, and pour the mix into a glass with ice.
Oh yeah.

Pico de Gallo!
3 medium sized tomatoes
1/2 lime
1/4 of an onion, finely chopped
1 garlic clove
1/4 C (or more, depending on your taste) of chopped cilantro
Salt and pepper

Chop the onion, garlic, and cilantro and put in a bowl. Add about 1/2 tsp salt, and a bit of pepper. Chop up the tomatoes and add them to the bowl, then add the lime. Use the same lemon squeezer thingamagig that you used for the margarita.
Stir the salsa to combine, and eat with corn chips!
Or, if you would like to be a bit more healthy, another good idea is to eat with thick cut cucumber slices.
So. Good.

<3 Stef

Thursday, April 16, 2009

Friday's Post-April 17

I regret to inform you all that I will be unable to post anything this Friday. I'm up in Portland visiting my friend Bryna who just had a baby. She (Bryna, not the baby) can make chocolate chip cookies without a recipe. She is the only person I know who can do this. She's kind of my hero.

I meant to prepare a post before I left California but it just never came together. I hope you enjoy my faux hostess cupcake recipe, though!
I want to make this up to you. So, I'm taking suggestions. My next post will be next Tuesday, April 21. So what would you like to see me make? The idea I like the best will be be the one I execute. 

Aaaaaaaand go!

<3 Stef

Tuesday, April 14, 2009

Recipe: Faux Hostess Cup Cakes

It's been a sweet couple of days. I usually emphasize savory dishes in this blog, because I don't have any original baking recipes (sorry, but I have to use a recipe to make chocolate chip cookies!) and because I'm not usually a big fan of sweets.
But I had this idea. I want to create the perfect cupcake. I bought some vanilla pudding mix (I feel that adding vanilla pudding mix to cake batter will make it more moist) and I already had marshmallow fluff from last Friday's post, so I decided to experiment.
I mean, even a failed cupcake is a cupcake, yeah?
Fortunately, these cupcakes did not fail. They were quite delicious, actually. And though they do not, in fact, contain vanilla cream in the middle, like Hostess Cupcakes do, they have marshmallow fluff.
Which might be better, actually.

Recipes borrowed and slightly altered from their original versions in "Perfecting the Cupcake" from the Food and Wine May 2008 issue.
Ingredients:
Chocolate Cake:
4 TB butter
1/2 C veggie oil
1/2 C water
1 C flour
1 C sugar
1/4 C + 2 TB unsweetened cocoa powder - I used sweetened cocoa powder that I had laying around the house, and cut the sugar in half.
3/4 tsp baking soda
1 egg
1/4 C buttermilk
1 tsp vanilla extract
2 TB instant vanilla pudding mix
1 TB marshmallow fluff per cupcake.

Frosting:
6 TB softened butter
2 C confectioner's sugar (powdered)
1/2 tsp vanilla
pinch of salt
2 TB milk, half and half, or cream
4 oz bittersweet chocolate, melted

Preheat the oven to 350˚.
Melt the butter with the oil and the water over low heat.
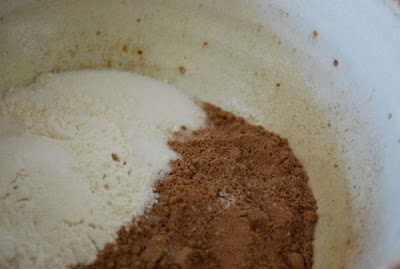
Mix together the flour, sugar, cocoa powder, baking soda, salt, and pudding mix.
Add the melted butter to the dry ingredients and mix until smooth. I am your butter river, carving up your valleys.
Mix mix mix.
Add the egg, buttermilk and vanilla and mix until all ingredients are incorporated. Oh, shiny!
Pour the batter into lined muffin tins, about half of the way full. Add 1 TB of marshmallow fluff to each tin.
Cover with the remaining batter.
Bake for approximately 25 minutes.

While you wait for the cupcake to bake, make the frosting. I, regretfully, do not have any frosting pictures. Use your collective imagination. Thick, creamy, chocolatey. . .mmmm.

Melt the chocolate and allow it to cool down before you cream it together with the butter. Mix the two ingredients together until they are smooth.

Mix in the sugar, vanilla, and salt, and mix until smooth. Add the cream, milk or half and half and beat until fluffy.

When you take the cupcakes out of the oven, make sure they have time to cool down before you frost them or the frosting will just melt all over the place.
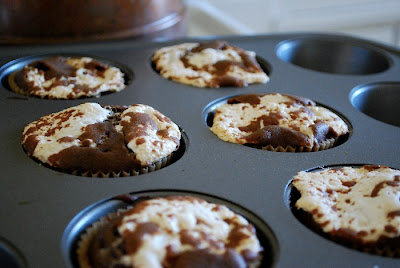
This is the most artistic cupcake picture I have ever taken.
Yum yum yum!

Do your best to share. It will be difficult. These cupcakes are very, very good.

<3 Stef

Friday, April 10, 2009

Recipe: Molten Chocolate Cake

This recipe hails from the September 2008 issue of Food and Wine magazine. These mini chocolate cakes are extremely easy to make and sinfully delicious. One of the coolest things about them is their versatility--you can use almost anything you like for the filling (I used marshmallow fluff and strawberry jam) or if you don't have a filling at all, the cake naturally creates its own molten chocolate center. Yum.

Ingredients:
Note that I cut this recipe in half in order to only make two cakes. My boyfriend and I don't need any more excuses to pig out than we already do!
1 stick of butter, plus melted butter for brushing
1 TB unsweetened cocoa powder
1/4 C plus 1 TB flour
6 oz dark chocolate, chopped
1/2 C sugar
3 large eggs
Pinch of salt
Your choice of filling, about 1 TB per cake. Some options:
Fruit jam
Marshmallow fluff
Caramel (with or without a bit of sea salt)
Peanut butter (mixed up with about 1 TB of powdered sugar)
Directions:

Preheat the oven to 425 degrees. Grease two ramekins. The recipe says to use melted butter for this, but I used veggie oil. Why? I'm a rebel. Also, the point of this is to ensure that the cake doesn't stick to the ramekins. I figured that veggie oil would work just as well. (It did.) I'm also lazy. Very, very lazy.
Mix together the cocoa powder and the 1 TB flour, and dust the greased ramekins.
Chop the chocolate and melt over low heat with the butter.
While it melts, whisk together the egg, sugar and salt until thick and pale yellow.
Gently fold the melted chocolate into the egg and sugar until there are no visible chocolate streaks.
Do the same for the flour.
Fill the ramekins 2/3 of the way with the batter, then spoon 1TB of your filling of choice on top, and cover with the remaining batter.
Put the ramekins onto a cookie sheet, and bake in the center of the oven for 16 minutes, until the tops are cracked but the center is still slightly jiggly. Look at the crazy marshmallow fluff cake! You will have to take my word for it when I tell you that they had jiggly centers.
Allow to cool for 10 minutes. Run a knife around the edge of the cakes to loosen, invert onto a plate, and serve. Top with powdered sugar, if you like. Yummy yummy yum!
I lived every child's dream tonight, as I gleefully ate dessert before dinner.

Hahaha!

<3 Stef

Saturday, April 4, 2009

A Meditation on Blueberry Muffins

I'm participating in the Omnomicon Blueberry Muffin Recipe Round-Robin. I submitted a recipe myself, and I can't say which recipes I'm trying (that would be against the rules) but I want to say that the muffin that I just ate was AMAZING. There is no way I am winning this thing. Once the contest is over all will be revealed, but for now, know this:
Yum.

Friday, April 3, 2009

Recipe: Chicken Pho

I am a Pho lover. LOVER. I eat mine with hoisin, basil and lots of lime. I typically get the rare beef stuff when I get it out (because I like my meat to be nearly raw) but I make chicken pho when I'm at home.
This isn't my recipe, sadly. It is the first one I found when I looked up "Chicken Pho Recipe" on google a few months ago. You can find the original on Food and Wine's website.
I want to mention a few things about this recipe before I get into all the messy stuff. First, you have to be prepared to spend at least 3 hours on this recipe if you follow the instructions and make the broth from scratch. You don't have to do it that way, in fact I usually don't. If you decide that you are lazy, you can use regular chicken broth and simmer it with chopped boneless, skinless chicken, the roasted veggies, salt, and sugar for like 30 - 45 minutes.
Second, if you decide to go all out and make the chicken broth, you will need either a whole chicken or a whole chicken already cut into pieces. If you don't have very good knife skills, don't have sharp knives, or are altogether unfamiliar with chopping up whole chickens, I suggest you buy the chicken already in pieces or have your butcher chop it up for you. Eventually I'll write a blog about knife skills, but until then, I'd prefer if no one loses a finger. Capiche?
Good.
Ingredients:
2 unpeeled yellow onions, quartered
3 1/2 inch thick slices of ginger, smashed
4 qt water
One 3.5 lb chicken
1 TB salt
2 tsp sugar
1/4 C fish sauce (do not be afraid of fish sauce!)
1 lb dried rice noodles
Garnish (all of this stuff is optional):
mung bean sprouts
basil leaves
lime
jalapeno
chili-garlic sauce
hoisin sauce
First quarter the onion and smash the ginger, and roast in a 400 degree oven for 30 minutes.
While the veggies are roasting, quarter the chicken (if you need to). First remove the chicken insides from the cavity. The chicken insides include the liver, heart, and neck, among other things. There they are, in the bowl in the back!
Now cut the entire chicken in half lengthwise. Yeeeah, raw chicken insides, woo!
Now cut each of these chicken halves in half again. I find it easier to flip them skin side up for this part.
There should be a picture of this, but I forgot and by the time I remembered the chicken was already boiling away. Oops.
Remember to always wash your hands when you handle poultry!
Now we are going to make a chicken insides bundle using cheesecloth and the chicken innards. This will be awesome for the chicken broth. First cut a length of cheesecloth.
Put all of the innards into the middle of the cloth. If you have any frozen innards from previous chickens, use those too. Yes, I save chicken giblets. You should, too.
Wrap the cheesecloth around the innards to make a bundle. I use thread to stitch it up very loosely, but kitchen twine or anything like that would work just as well.
Take the roasted veggies from the oven. Mmmm, don't they look amazing?
Put all of the veggies, the chicken pieces, the innard and cheesecloth bundle, the salt, the sugar, and the water in a big soup pot and put it on the stove over medium high heat for 30 minutes. The idea is to cook the chicken.
Remove the chicken from the pot and separate the meat from the skin and the bones.
Put the skin and the bones back into the pot, and the meat in the refrigerator. Simmer the broth for 2 hours. Strain the broth using a colander and a very big bowl. This bowl was not big enough. I burned my finger. Use a very, very big bowl. And your common sense.
Return the strained broth to the soup pot and set to boil for a further 20 minutes. Stir in the fish sauce. Bubbly bubbly.
While you wait, soak the rice noodles in warm water for 15 minutes. This time may be different, depending on the noodles that you bought, so make sure you read the instructions on the box.
After the noodles are done soaking, drain the water, and add new salted water to the noodles. Bring the noodles to a boil, and then allow them to boil for about 3 minutes. Drain them.

Shred the chicken into the broth and simmer until heated.
Serve by putting a big bunch of noodles into a bowl, and then pouring the broth and the chicken over the noodles. Serve the soup with your choice of condiments listed above.
Yum! The best thing about making this recipe is that you have pho for days. Just make sure not to mix the noodles with the broth when you store it, otherwise the noodles will get all soggy.

<3 Stef